Contact Matching Documentation
Introduction
This documentation provides an overview of contact matching in Salesforce and how it is configured within the Summit Event application. IMPORTANT: Currently Summit Events contact matching feature DOES NOT support person accounts. If your instance uses person accounts, do not enable contact matching. Person accounts will be addressed in a future release.
Setting Up Contact Matching
Salesforce Duplicate Rules
To set up contact matching, we leverage standard Salesforce functionality, specifically Salesforce Duplicate Rules.
In the Summit Event application, navigate to the “Contact and Lead Matching” tab to configure contact matching.
You have the option to use an advanced contact creation rule with custom Apex logic or use Salesforce Duplicate Rules.
When choosing to use Salesforce Duplicate Rules, select the desired contact creation duplicate rule.
Creating New Salesforce Duplicate Rules
- You can set up matching rules based on specific criteria, such as first name, last name, or email address. These rules determine when duplicates are identified.
- configure the Lead Duplicate Rule settings, follow these guidelines:
- Set the “Record-Level Security” field value to “Bypass sharing rules.” This lets guest user profile used for registration see the Leads in the org.
- Ensure that the “Alert” checkboxes are unchecked. This is needed to ensure the registrant does not receive alert messages.
- Activate the matching rule once you’ve configured it.
Add the Custom Rule Name as a Picklist value in the Contact Creation Rule feild of the Summit Event object.
- From Setup, search for the Summit Event object
- In the Fields and Relationships area, search for and select the Contact Creation Duplicate Rule field.
- Click the New button to add a New piclist value.
- Copy and Paste the name of your newly created duplicate rule here and save your changes.
- Under Picklist options, click on Change next to the controlling field “Contact Matching Rule”.
- Make sure the new Picklist item is added to Salesforce Duplicate Rule.
Contact Creation Options
- Choose the action to take when a match is found or not found:
- Create a new contact: Automatically create a new contact record in Salesforce when no match is found.
- Skip creating: Skip creating a contact and handle it manually or through a flow.
- Specify how the application should handle multiple matches, whether to skip matching entirely or match to the most recently modified record.
Testing Contact Matching
Test the contact matching feature by registering multiple instances under the same name.
Check the matching log to see which records matched and the actions taken based on your configuration.
Verify that custom field mappings and data transfers work as expected.
Field Values Automatically Added to Contacts When Matching Rules Create New Contacts
When a new Contact is created by the Contact Matching Rule the following fields from the Summit Events Registration record are automatically added to the Contact record:

Adding Additional Field Values When Matching Rules Create New Contacts
If you want additional field values to be added to the Contact record you can use the “Custom Metadata Contact Matching Method” on Summit Events to do this. Custom Metadata Types is the Salesforce tool that allows an admin to create field mappings that are read by the code in the managed package - for details take a look at More Info On Custom Metadata Types.
Custom Metadata for Field Mapping
By default there are standard fields that are mapped from the registration record and written to the Contact record when a match is found. See “Field Values Automatically Added to Contacts when Matching Rule Creates New Contact” section for details. In addition to this, Summit Events allows custom field mapping between the registration and the Contact record. These mappings define how data flows from Summit Event to Salesforce.
Map additional feilds using Custom Metadata follow these steps:
- In setup, search for and select Custom Metadata Types.
- Click on the Label “Summit Events Contact Matching Mapping”.
- Next, click on the Manage Summit Event Contact Matching Mappings button.
- Click the New button, to add a new mapping.
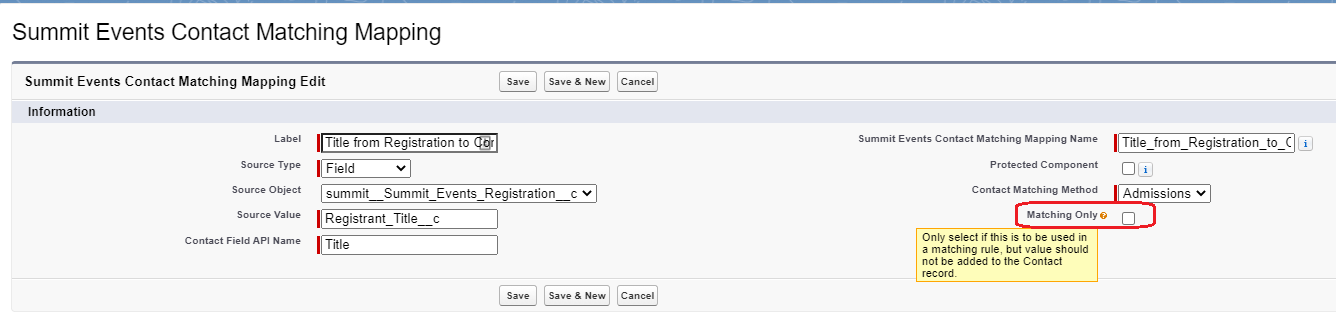
- Enter the information to be mapped.
- Label - Label for custom metadata entery
- Source Type - set to “Field”
- Soure Object - set to “summit__Summit_Events_Registration__c”
- Source Value - the api name of the field on the summit__Summit_Events_Registration__c registration object.
- Contact Field API Name - the api Name of the feild on the Contact object where the value will be stored/mapped.
- Summit Events Contact Matching Mapping Name - ????
- Protected Component - ????
- Contact Matching Method - set to “Admissions”
- Matching Only - check if want to match on field only, not to write data to field.
- Create a Custom Metadata record for each field value, beyond the standard mapped fields, you want to be added to the Contact record.
Here is an example of what the Custom Metadata records look like for Contacts:
Conclusion
This documentation covers the setup and configuration of contact matching in the Summit Event application using Salesforce Duplicate Rules and custom metadata for field mapping. Testing the feature helps ensure that records are matched and data is transferred accurately.
test